

In our series of WordPress learning, so far we’ve talked about what is WordPress, and the impact of choosing the best WordPress theme for your website. Now we will see how you can customize a new theme and tailor it to meet your needs. Because WordPress theme customization is a skill that you must possess to tweak the settings of any WordPress. Otherwise, you will have to depend on the layout an designs that your theme offers by default. So in today’s article, we will see what is WordPress theme customization and how to customize a theme.
Before we start talking about WordPress theme customization, we need to see how you can upload a WordPress theme your site.
How to Upload WordPress Theme?
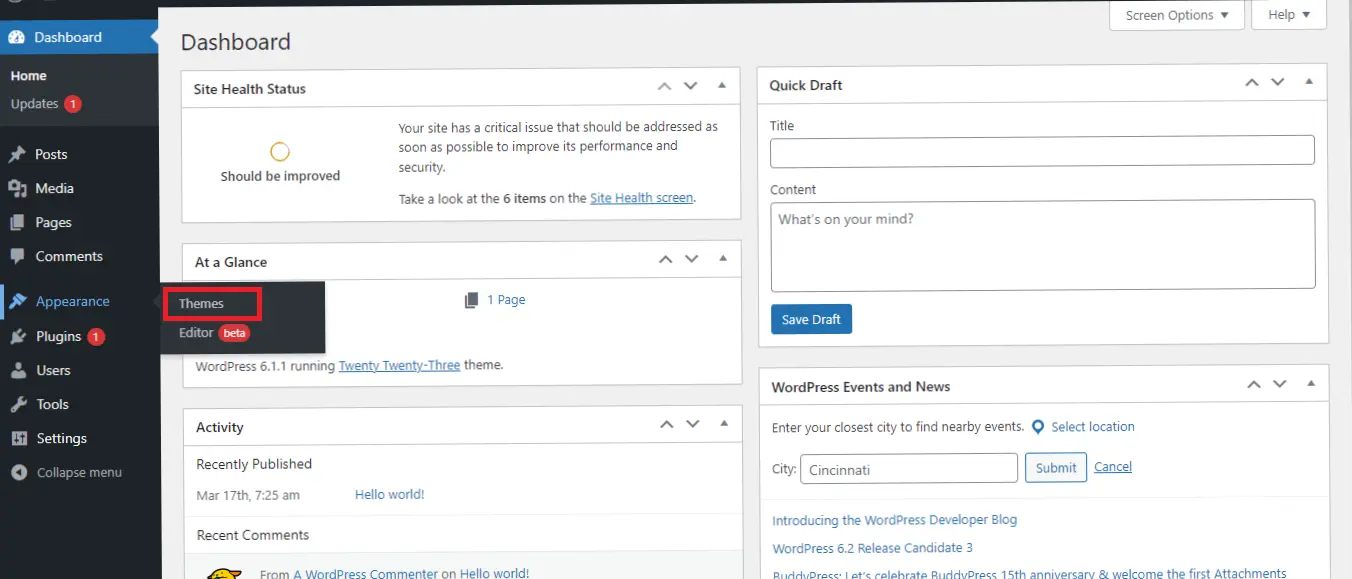
To upload a theme on your WordPress website, you do the following steps:
-> Login to your Admin Dashboard
-> Hover over "Appearance” in the sidebar menu
-> Click "Themes”
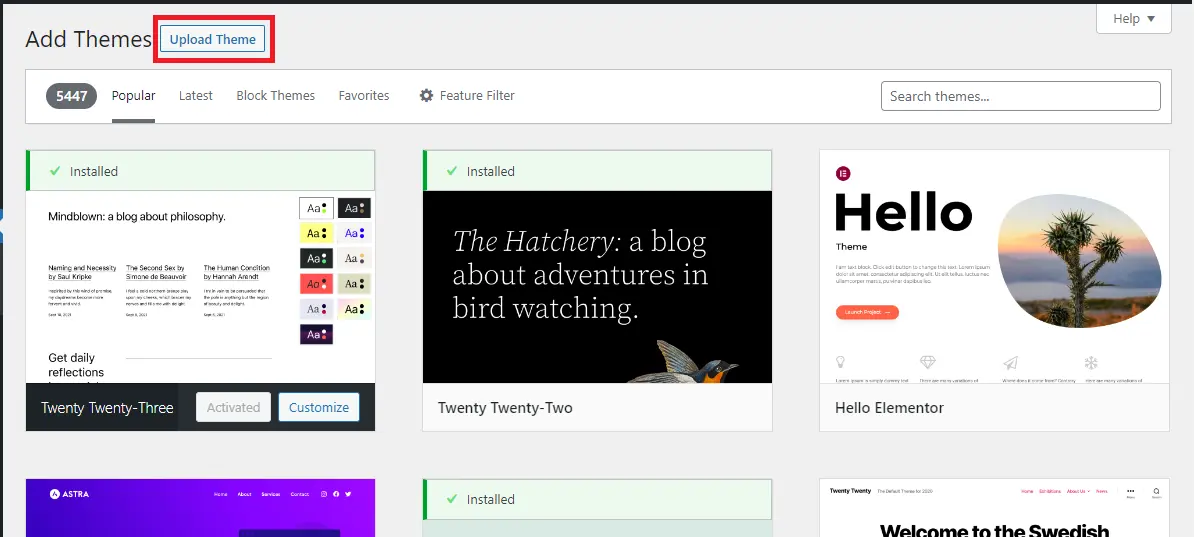
-> Then click "Add New”. Then click "Upload Theme”, select your theme file and click "install”
If for some reason, you’re unable to install the theme from your admin dashboard, you can upload the theme through your file manager. If you’re working on live environment, then follow this path to upload the theme:
public_html/wp-content/themes
And if you’re working on some local environment like Xampp server, your directory will look like this:
Local Disk: C>Xampp>your_website_folder> wp-content>themes
In both the cases, after uploading the file in your themes folder, you will have to refresh your admin dashboard page to see if the theme is added to your installed themes list.
Understanding WordPress Theme Structure
By understanding the structure of a WordPress theme, you can better understand how to make customizations to your site and where to find the appropriate files and templates to modify. It’s important to note that modifying theme files directly can be risky, which is why creating a child theme is recommended. With a child theme, you can make customizations without affecting the original theme files, making it easier to update your theme in the future.
Creating Child Theme
A child theme is a copy of an existing theme that inherits the styles and functionality of the parent theme but allows you to make customizations without affecting the original theme files. Creating a child theme is recommended as it allows you to keep the original theme files intact and update the parent theme without losing your customizations.
To create a child theme, you need to create a new folder in your WordPress themes directory and create a style.css file with the necessary information. You can then add your custom CSS code or PHP functions to the child theme’s functions.php file.
Customizing A WordPress Theme Using the Theme Customizer
The WordPress Theme Customizer is a built-in tool that allows you to make basic customizations to your theme such as changing the site title, logo, colors, and fonts. To use the Theme Customizer, go to Appearance > Customize in your WordPress dashboard. You can then preview the changes before making them live.
Using Plugins for WordPress Theme Customization
Plugins are third-party tools that can be used to add functionality to your WordPress site. There are many plugins available for customizing WordPress themes, such as Elementor, Beaver Builder, and Visual Composer. These plugins allow you to create custom layouts and add new design elements to your site without writing code.
Best Practices For WordPress Theme Customization
When customizing a WordPress theme, it’s important to backup your site before making changes and to test your customizations on a staging site before making them live. It’s also recommended to keep your WordPress and theme files up-to-date to avoid security vulnerabilities and compatibility issues.
How To Change Theme Fonts And Colors Through Theme Customizer
The WordPress Theme Customizer is a built-in tool that allows you to make basic customizations to your theme such as changing the site title, logo, colors, and fonts. Here’s how to customize the color scheme and fonts of your WordPress site using the Theme Customizer:
-> Go to Appearance > Customize in your WordPress dashboard.
-> Click on the "Colors” section in the Theme Customizer.
You’ll see different color options, such as background color, header color, and link color. You can click on each color option to select a new color or enter a custom color code. You can also use the color picker tool to select a color from a palette.
Once you’ve selected your desired colors, click "Publish” to make the changes live on your website.
To customize the fonts on your website, click on the "Typography” section in the Theme Customizer.
You’ll see options to customize the font family, font size, and font weight for different elements on your website, such as headings and paragraphs.
You can select a new font family from the list of Google Fonts, or enter a custom font family name if you have a specific font in mind. You can also adjust the font size and weight to your liking. Once you’ve made your font customizations, click "Publish” to make the changes live on your website.
As this series is about learning WordPress from scratch, so it is important to know that whenever you start developing your WordPress website, always start by finalizing your color scheme and fonts for your stie. Then proceed further and design your header and footer first. These are things that you can call “first things first” for your WordPress website.
WordPress Theme Customization: Final Words
Customizing a WordPress theme can be a great way to make your website stand out and reflect your brand. With the right tools and best practices, even beginners can make customizations to their WordPress site. We hope this beginner’s guide to WordPress theme customization has been helpful in getting you started on customizing your own website.
Read More:
What is WordPress? A Simple Introduction for Beginners
How to Choose the Best WordPress Theme for Your Website